
Available for $100, contact me.
I chose the dominos on this one because of the color and graphics. I have a demo of this below.
Demo
Some of you have been asking about my view finder and process. This is process has evolved from when I started and I was just simply observing and sketching, to what I now do using my view finder. Some of you might find it helpful, some will find it too much information, some of you will want to delete it and the rest will think I'm off my rocker and should be in the loony bin. But here goes..

This is my view finder for my square pieces. I use it for my 6"x6" and it can be used for any square format. The inside square is smaller than 6x6 it is actually 4.5"x4.5". I Threaded heavy black button thread through little holes I made on the 1/3 increments. Taped it off on the back with clear packing tape to reinforce it. I like this method because there is not clear plastic to distort the image or get dirty.

This is my view finder for my 5"x7" and 6"x8" pieces. Here again the opening is smaller, it is 5.25"x3.75". It is constructed in the same way but I now have divided it into 4th on the long side and 3rds on the short side.

This is original view finder before I made the ones above. You notice that the strings are not there I just relied on the markings on the side and the opening is actually 5"x7". I quickly found that this was just too big and I could not get the tight close cropping I wanted. By making the opening smaller worked better for me. A lot of people use those small grey adjustable view finders which are very useful and are great for travel.

Here is my 6"x8" canvas, it is actually an Ampersand Gessobord that I have glued canvas on and painted Golden Acrylic N6 Neutral Gray for an under painting. (I don't always put the grey on when I do portraits.) I used to just put the paint marks on the edges (as shown) but now I put a light pencil line across. I fine it more accurate. Today I did both just for this demo.

You can see the two extra marks I have put in place, these are my line up marks for this painting. When I looked through my view finder at the set up I liked it when the lower edge of the cup rim lined up with the 1/3 down - 1/4 over mark. I also noticed that the handle of the cup lined up with the 1/3 down - 1/2 over mark. These are going to be my key points that I look for when lining up the view finder every time I look through it while blocking it in. After I block it all in (5-10 minutes) I put the view finder down and don't look in it again.

I always start with the place that have the key line up marks. This time it is the cup.

Then I start branching out and put in marks for the saucer.

I don't know why I put in this picture it seems redundant now! But here it is. You will have to excuse the way these pictures look. They have a fish eye look about them because I was too close and lazy to get out the tripod and set it up behind me so I could zoom in. Oh Well, now you know I'm lazy.

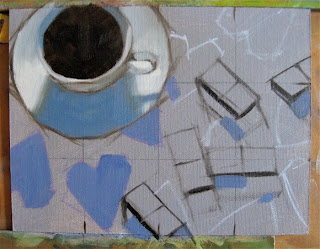
Using the grid I blocked in the dominos and shadows

I blocked in the hearts because the white color is more sensitive. (If I were to do the red first it would turn to pink on the edges when I put in the white.) I blocked in the shadow hearts in the shadow color of white. (some form of blue/purple since the light source is yellow)

Thank goodness the blocking is now done! Now I get to the painting portion. Here again I started with the cup because I wanted to establish the yellow white of the cup and shadows.
Blocked in the shadow white.

Painted in the white hearts and started painting the red shadow area.

Painted the light red. You will notice that I have been painting the "first stroke is the last stroke" method. In other words when I figure out the color value of each area and stroke, I lay it in that color value so I won't have to go back in and "fix" or adjust it later. Not to say that I don't do this at times, in fact you will see that I did this a little in the end on this painting. But for the most part I paint these daily paintings "first is last".

This is the final signed painting. I painted in the dominos and made some subtle changes in the saucer and cup shadows. Another 2 hours of my day, I got a painting done and listened to 2 more hours of my audio book. (Currently listening to "Dark Angels" novel by Karleen Koen.)
My website: http://claudiahammer.com
My ebay store: http://stores.shop.ebay.com/claudiahammer
My email: iclaudiahammer@insightbb.com


.JPG)


